
오늘은 우분투의 CUDA 설치 (재설치)에 대해 정리해 보았습니다.
CUDA 및 Nvidia-Driver 초기화
sudo apt-get purge nvidia*
sudo apt-get autoremove
sudo apt-get autoclean
sudo rm -rf /usr/local/cuda*
Nvidia-driver 재설치
sudo apt-get update
sudo apt-get upgrade
sudo apt-get install ubuntu-drivers-common
ubuntu-drivers devices
여기서 호환되는 driver 중 recommended가 붙어있는 driver가 가장 좋습니다. (server. open이 붙어 있는 것들은 가급적 피해서 다운받아주세요.)
원하는 CUDA 버전에 맞는 Driver는 여기서 확인할 수 있습니다.
CUDA Compatibility :: NVIDIA Data Center GPU Driver Documentation
The NVIDIA® CUDA® Toolkit enables developers to build NVIDIA GPU accelerated compute applications for desktop computers, enterprise, and data centers to hyperscalers. It consists of the CUDA compiler toolchain including the CUDA runtime (cudart) and vari
docs.nvidia.com


호환되는 driver (<recommended driver> ex) nvidia-dirver-535)를 다운로드 받고 재부팅 합니다.
sudo apt-get install <RECOMMENDED-DRIVER>
sudo reboot now
혹시 ubuntu-drivers-common 명령어에서 ERROR:root:aplay command not found 오류가 나타나는 경우 다음 패키지를 설치해줍시다.
sudo apt-get install alsa-utils
CUDA 설치
nvidia-smi 명령어를 통해 driver에 맞는 CUDA version을 확인합니다.
nvidia-smi

Fri Oct 27 05:27:33 2023
+---------------------------------------------------------------------------------------+
| NVIDIA-SMI 535.113.01             Driver Version: 535.113.01   CUDA Version: 12.2     |
|-----------------------------------------+----------------------+----------------------+
| GPU  Name                 Persistence-M | Bus-Id        Disp.A | Volatile Uncorr. ECC |
| Fan  Temp   Perf          Pwr:Usage/Cap |         Memory-Usage | GPU-Util  Compute M. |
|                                         |                      |               MIG M. |
|=========================================+======================+======================|
|   0  NVIDIA GeForce RTX 3090        Off | 00000000:01:00.0 Off |                  N/A |
|  0%   31C    P8              12W / 370W |      3MiB / 24576MiB |      0%      Default |
|                                         |                      |                  N/A |
+-----------------------------------------+----------------------+----------------------+

+---------------------------------------------------------------------------------------+
| Processes:                                                                            |
|  GPU   GI   CI        PID   Type   Process name                            GPU Memory |
|        ID   ID                                                             Usage      |
|=======================================================================================|
|  No running processes found                                                           |
+---------------------------------------------------------------------------------------+
저는 nvidia-driver-535를 받아서 CUDA version 12.2를 설치해야 합니다. 다음 주소에서 version에 맞는 CUDA Toolkit을 확인합니다.
https://developer.nvidia.com/cuda-toolkit-archive
CUDA Toolkit Archive
Previous releases of the CUDA Toolkit, GPU Computing SDK, documentation and developer drivers can be found using the links below. Please select the release you want from the list below, and be sure to check www.nvidia.com/drivers for more recent production
developer.nvidia.com
Platform에 맞춰 명령어를 확인합니다.. 저는 Linux-x86_64-Ubuntu-22.04-runfile(local)로 확인했습니다.
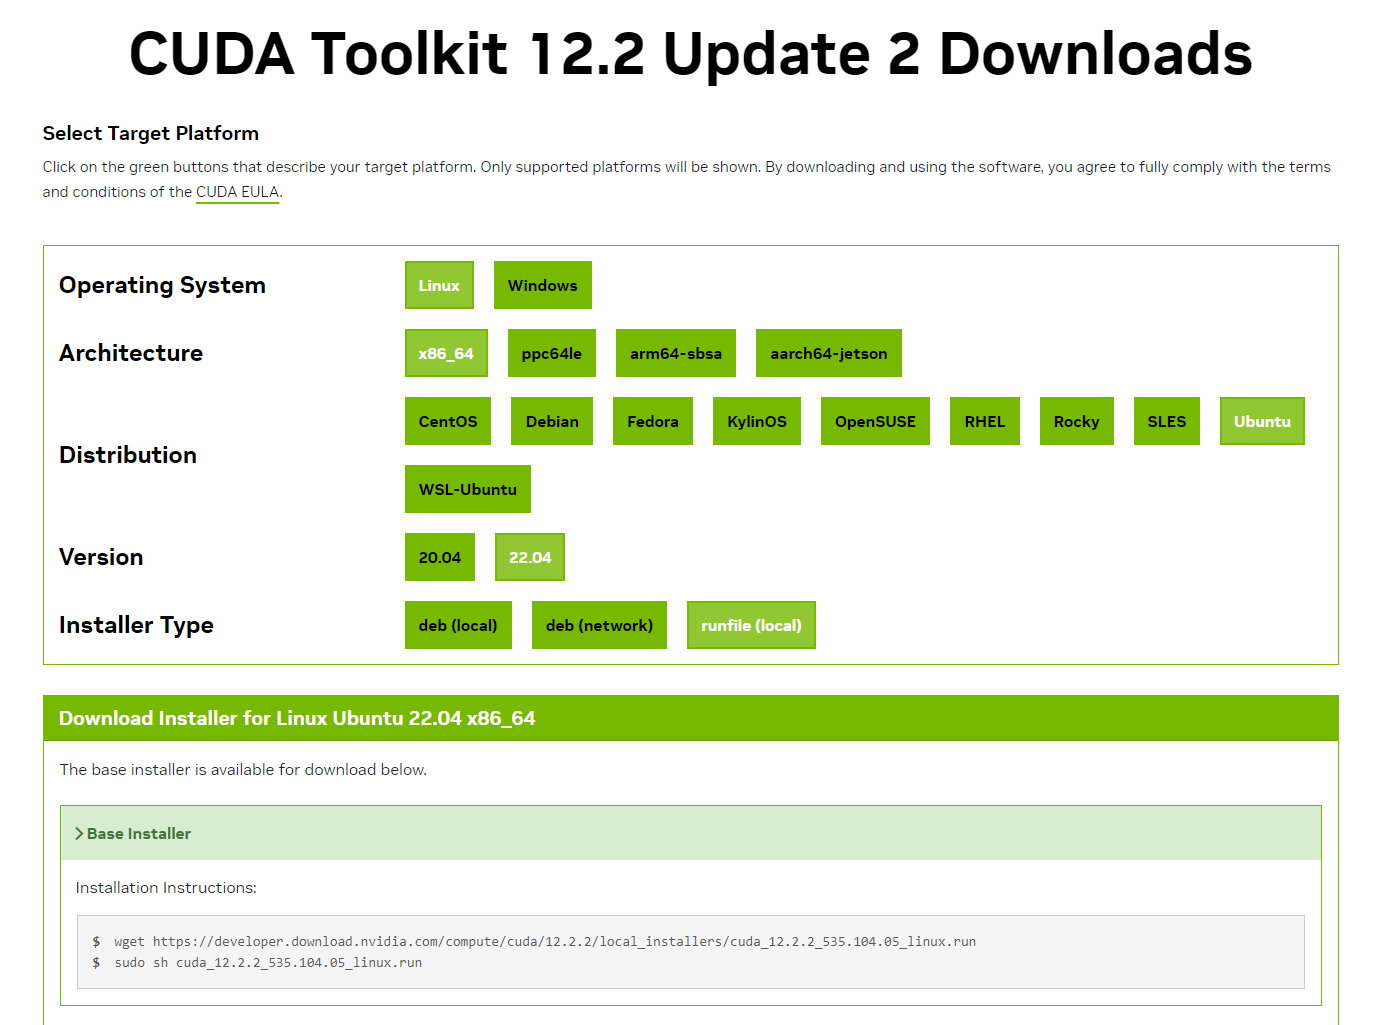
wget https://developer.download.nvidia.com/compute/cuda/12.2.2/local_installers/cuda_12.2.2_535.104.05_linux.run
sudo sh cuda_12.2.2_535.104.05_linux.run
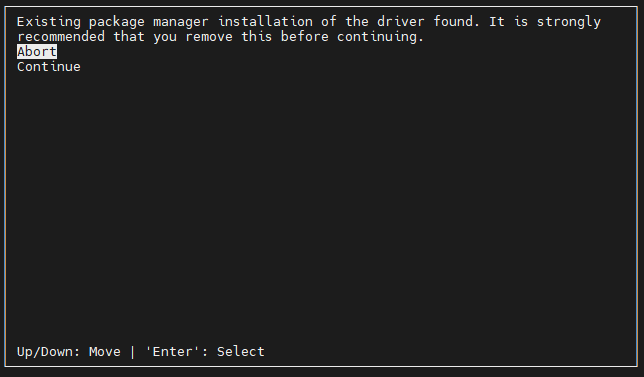
run파일을 실행하면 터미널이 창이 뜰 것입니다. Continue를 선택해줍시다.
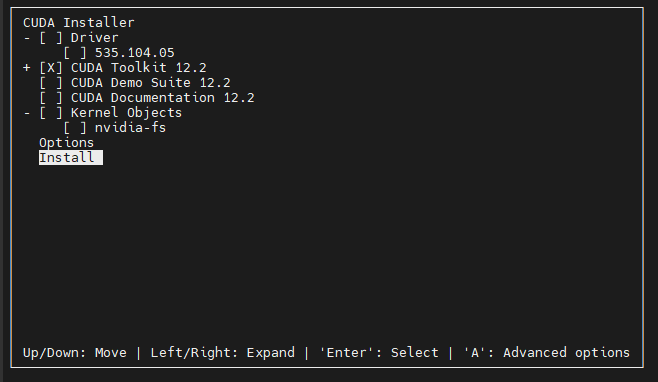
Licence 관련된 EULA 동의 창에서는 accept를 입력해주고 다음으로 CUDA Installer에서는 CUDA Toolkit만 다운로드합니다. (Driver는 이미 다운받아져 있기 때문에 다운받지 않습니다.)
CUDA 설치가 완료되었으므로 환경변수에 추가해줍니다.
vi /etc/profile

export PATH=$PATH:/usr/local/cuda/bin
export LD_LIBRARY_PATH=$LD_LIBRARY_PATH:/usr/local/cuda>/lib64
export CUDADIR=/usr/local/cuda
profile을 적용합니다.
source /etc/profile
다음 명령어를 통해 CUDA가 잘 설치되었는지 확인 할 수 있습니다.
nvcc -V

<잘 설치 된경우>
nvcc: NVIDIA (R) Cuda compiler driver
Copyright (c) 2005-2023 NVIDIA Corporation
Built on Tue_Aug_15_22:02:13_PDT_2023
Cuda compilation tools, release 12.2, V12.2.140
Build cuda_12.2.r12.2/compiler.33191640_0

<잘못 설치한 경우>
Command 'nvcc' not found, but can be installed with:
apt install nvidia-cuda-toolkit
Please ask your administrator.
cuDNN 설치
cuDNN은 다음 주소에서 설치 할 수 있습니다. cuDNN은 nvidia 계정을 가진 사람만 설치할 수 있으니 회원가입후 로그인하여 설치합니다. 이때 설치는 Deb가 아닌 zip이나 tar 파일을 사용합니다.
https://developer.nvidia.com/cudnn
CUDA Deep Neural Network
cuDNN provides researchers and developers with high-performance GPU acceleration.
developer.nvidia.com
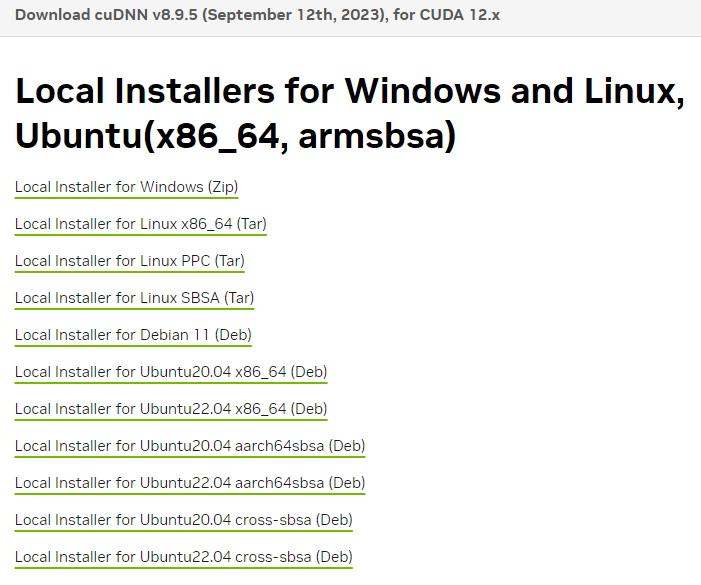
저는 Local Installer for Linux x86_64 (Tar)을 다운 받았습니다. 다운받은 후 Ubuntu Server로 옮겨주세요.
다 옮겼으면 압축을 풀고, 필요한 파일들을 옮깁니다.
tar -xvf cudnn-linux-x86_64-<CUDNN VERSION>.tar.xz
mv cudnn-linux-x86_64-<CUDNN VERSION> cudnn
sudo cp cudnn/include/cudnn* /usr/local/cuda/include
sudo cp -P cudnn/lib/libcudnn* /usr/local/cuda/lib64
sudo chmod a+r /usr/local/cuda/include/cudnn.h /usr/local/cuda/lib64/libcudnn*
다음 명령어를 통해 cudnn이 잘 설치되었는지 확인 할 수 있습니다.
cat /usr/local/cuda/include/cudnn_version.h | grep CUDNN_MAJOR -A 2

#define CUDNN_MAJOR 8
#define CUDNN_MINOR 9
#define CUDNN_PATCHLEVEL 5
--
#define CUDNN_VERSION (CUDNN_MAJOR * 1000 + CUDNN_MINOR * 100 + CUDNN_PATCHLEVEL)

/* cannot use constexpr here since this is a C-only file */
CUDA 오류 해결방법
설치 후 cuda 관련 메소드들이 정상적으로 반응하는데 학습이 안되는 경우가 있습니다.
대표적으로 다음 오류들이 있습니다.
Could not load library libcudnn_cnn_train.so.8. But I’m sure that I have set the right LD_LIBRARY_PATH

Segmentation fault (core dumped)
여러가지 문제가 있을 수 있습니다. (torch와 같은 라이브러리의 CUDA 버전이 다르거나 nvidia driver와 cuda 버전이 안맞는다거나..) 다만 이외에도 아래 이유 때문에 오류가 발생할 수 있으니 한번 참고해보시기 바랍니다.
/usr/local/cuda-x.x에 대한 오류
/usr/local/ 에는 cuda와 cuda-x.x 디렉토리가 있습니다.(예를 들어 cuda 11.8을 설치한 경우 cuda/ cuda-11.8/ 이 있습니다.) 이 두개 버전의 충돌 때문에 오류가 발생하는 경우가 있습니다. 위의 환경변수 설정과 같이 환경변수를 cuda/ 디렉토리로 지정해 놨다면 다음을 시도해보세요.
cd /usr/local/cuda-<version>
# ex) cd /usr/local/cuda-11.8

sudo rm -rf lib64/libcudnn*
sudo rm -rf include/cudnn*
저는 이 오류 때문에 CUDA 설치 후에 학습이 안된적이 많았습니다. 참고해주세요.
Could not load library libcudnn_cnn_train.so.8. But I'm sure that I have set the right LD_LIBRARY_PATH
The PyTorch binaries ship with their own CUDA dependencies (including cuDNN), so remove your locally installed cuDNN (temporarily) from the library path and let PyTorch load it’s own libs. If you want to use your locally installed CUDA toolkit you could
discuss.pytorch.org
'Linux' 카테고리의 다른 글
| [Linux] LVM 사용하기 (0) | 2023.12.09 |
|---|---|
| [Linux] 명령어 모음 (0) | 2023.12.09 |
| [Linux] Ubuntu 초기 Setting 가이드 (1) | 2023.12.08 |
| [Linux] Ubuntu Server Security Setting (0) | 2023.03.10 |
| [Linux] Ubuntu 네트워크 오류 해결 방법 (3) | 2023.01.26 |